Insert/Delete
From version 5 EPPlus can insert and delete rows, columns and ranges in a worksheet. Formulas/references in the workbook affected by the change will be adjusted, EPPlus does this for formulas, styles, tables, pivot tables, data validations, filters, conditional formatting, sparklines and drawings.
If you need to refresh the cell values after the insert/delete operation you can call the Calculate() method.
On this page
- Insert entire columns
- Insert entire rows
- Delete entire columns
- Delete entire rows
- Insert ranges/cells
- Delete ranges/cells
Insert entire columns
We start by creating a workbook, and add a sheet with some numbers and formulas
using var package = new ExcelPackage();
var sheet = package.Workbook.Worksheets.Add("Sheet 1");
// FillNumber will add 1, 2, 3, etc in each cell of the range
sheet.Cells["A1:A5"].FillNumber(x => x.StartValue = 1);
// Add two more columns with shared formula that refers to eachother.
sheet.Cells["B1:B5"].Formula = "A$1:A$5 + 1";
sheet.Cells["C1:C5"].Formula = "B$1:B$5 + 1";
sheet.Cells["A1:C5"].Style.Fill.SetBackground(Color.LightYellow);
Using package As New ExcelPackage()
    Dim sheet = package.Workbook.Worksheets.Add("Sheet 1")
    ' FillNumber will add 1, 2, 3, etc in each cell of the range
    sheet.Cells("A1:A5").FillNumber(Sub(x) x.StartValue = 1)
    ' Add two more columns with shared formula that refers to eachother.
    sheet.Cells("B1:B5").Formula = "A$1:A$5 + 1"
    sheet.Cells("C1:C5").Formula = "B$1:B$5 + 1"
    sheet.Cells("A1:C5").Style.Fill.SetBackground(Color.LightYellow)
End Using
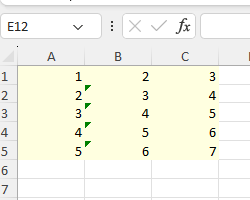
Now we can use the Insert method to insert a column.
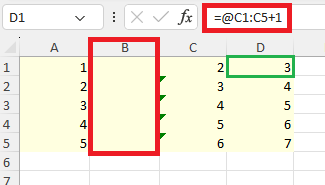
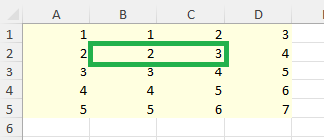
As you can see EPPlus has inserted a new column B and moved the former B and C columns to the right. The formula in cell D1 (that previously referred to column B1) has been shifted so it still refer to its neighboring column. The styling (lightyellow background) has also been extended to the right.
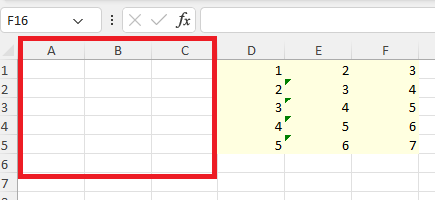
Insert multiple columns
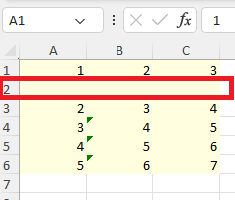
Insert entire rows
Works as insert columns, but you use eShiftTypeInsert.EntireRow instead.
Delete entire columns
This is similar to the example in insert columns, but we add an extra column B that we will delete.
using var package = new ExcelPackage();
var sheet = package.Workbook.Worksheets.Add("Sheet 1");
sheet.Cells["A1:A5"].FillNumber(x => x.StartValue = 1);
sheet.Cells["B1:B5"].FillNumber(x => x.StartValue = 1);
sheet.Cells["C1:C5"].Formula = "A$1:A$5 + 1";
sheet.Cells["D1:D5"].Formula = "C$1:C$5 + 1";
sheet.Cells["A1:D5"].Style.Fill.SetBackground(Color.LightYellow);
Using package As New ExcelPackage()
    Dim sheet = package.Workbook.Worksheets.Add("Sheet 1")
    sheet.Cells("A1:A5").FillNumber(Sub(x) x.StartValue = 1)
    sheet.Cells("B1:B5").FillNumber(Sub(x) x.StartValue = 1)
    sheet.Cells("C1:C5").Formula = "A$1:A$5 + 1"
    sheet.Cells("D1:D5").Formula = "C$1:C$5 + 1"
    sheet.Cells("A1:D5").Style.Fill.SetBackground(Color.LightYellow)
End Using
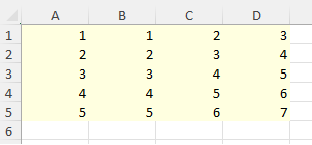
Now let's remove column B.
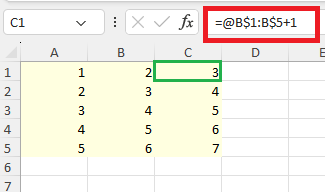
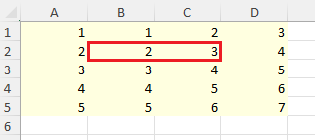
Column B has now been deleted from the worksheet and the former columns C and D has been moved left. The formulas in column C (previously column D) has been shifted so they still refer to its neighboring column.
Delete entire rows
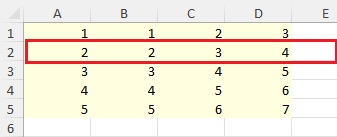
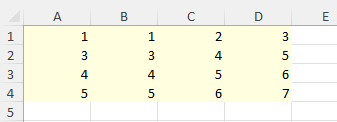
Works as delete columns, but you use eShiftTypeInsert.EntireRow instead.
Insert ranges/cells
To insert specfic cell/range you use the Insert function, but use eShiftTypeInsert.Down or eShiftTypeDelete.Right
Example
using var package = new ExcelPackage();
var sheet = package.Workbook.Worksheets.Add("Sheet 1");
sheet.Cells["A1:A5"].FillNumber(x => x.StartValue = 1);
sheet.Cells["B1:B5"].FillNumber(x => x.StartValue = 1);
sheet.Cells["C1:C5"].Formula = "A$1:A$5 + 1";
sheet.Cells["D1:D5"].Formula = "C$1:C$5 + 1";
sheet.Cells["A1:D5"].Style.Fill.SetBackground(Color.LightYellow);
Using package As New ExcelPackage()
    Dim sheet = package.Workbook.Worksheets.Add("Sheet 1")
    sheet.Cells("A1:A5").FillNumber(Sub(x) x.StartValue = 1)
    sheet.Cells("B1:B5").FillNumber(Sub(x) x.StartValue = 1)
    sheet.Cells("C1:C5").Formula = "A$1:A$5 + 1"
    sheet.Cells("D1:D5").Formula = "C$1:C$5 + 1"
    sheet.Cells("A1:D5").Style.Fill.SetBackground(Color.LightYellow)
End Using
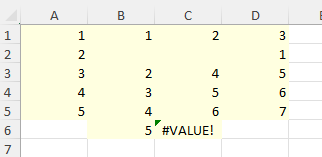
Since the two rows affected by the insertion have been shifted a row "down" the formula in C6 now refers to A\(</span>1:A<span>\)5 via implicit intersection, which generates a #VALUE! error
Delete ranges/cells
To delete a specfic cell/range you use the Delete function, but use eShiftTypeDelete.Up or eShiftTypeDelete.Left
Example
using var package = new ExcelPackage();
var sheet = package.Workbook.Worksheets.Add("Sheet 1");
sheet.Cells["A1:A5"].FillNumber(x => x.StartValue = 1);
sheet.Cells["B1:B5"].FillNumber(x => x.StartValue = 1);
sheet.Cells["C1:C5"].Formula = "A$1:A$5 + 1";
sheet.Cells["D1:D5"].Formula = "C$1:C$5 + 1";
sheet.Cells["A1:D5"].Style.Fill.SetBackground(Color.LightYellow);
Using package As New ExcelPackage()
    Dim sheet = package.Workbook.Worksheets.Add("Sheet 1")
    sheet.Cells("A1:A5").FillNumber(Sub(x) x.StartValue = 1)
    sheet.Cells("B1:B5").FillNumber(Sub(x) x.StartValue = 1)
    sheet.Cells("C1:C5").Formula = "A$1:A$5 + 1"
    sheet.Cells("D1:D5").Formula = "C$1:C$5 + 1"
    sheet.Cells("A1:D5").Style.Fill.SetBackground(Color.LightYellow)
End Using
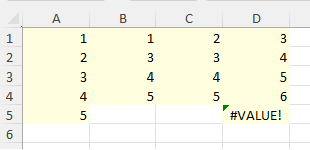
Since the row affected by the deletion has been shifted a row "up" the formula in D5 now refers to C\(</span>1:C<span>\)4 via implicit intersection, which generates a #VALUE! error