Skip to content

LoadFromCollection

This method provides an easy way to load data from IEnumerables of .NET classes into a spreadsheet. From EPPlus 5.5 you can use attributes to get more fine granular control over the spreadsheet table and add calculated columns.

Basic usage

We can start with the following simple class...

public class MyClass
{
    public string Id { get; set; }
    public string Name { get; set; }
    public int Number { get; set; }
}
Public Class [MyClass]
    Public Property Id As String
    Public Property Name As String
    Public Property Number As Integer
End Class

...and a a few instances of it in a List.

var items = new List<MyClass>()
{
    new MyClass(){ Id = "123", Name = "Item 1", Number = 3},
    new MyClass(){ Id = "456", Name = "Item 2", Number = 6}
};
Dim items = New List(Of [MyClass])() From {
    New [MyClass]() With {.Id = "123", .Name = "Item 1", .Number = 3},
    New [MyClass]() With {.Id = "456", .Name = "Item 2", .Number = 6}
}

Now let's create a workbook with a worksheet and add this data into it using the LoadFromCollection method. The method returns the range to which data was imported.

using (var pck = new ExcelPackage())
{
    var sheet = pck.Workbook.Worksheets.Add("sheet");
    var range = sheet.Cells["C1"].LoadFromCollection(items);
}
Using pck As New ExcelPackage()
    Dim sheet = pck.Workbook.Worksheets.Add("sheet")
    Dim range = sheet.Cells("C1").LoadFromCollection(items)
End Using

This will load the following data into the worksheet.
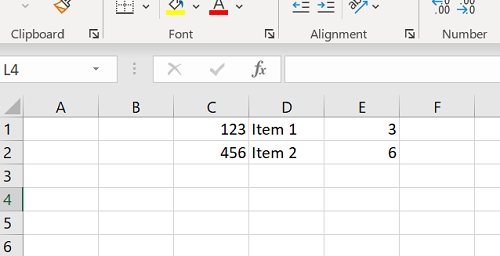
LoadFromColl2

LoadFromCollection has several method signatures and argument number 2 specifies if we should have a row with headers above the data. In this case the headers will have the same values as the names of the class properties, i.e. "Id", "Name" and "Number".

sheet.Cells["C1"].LoadFromCollection(items, true);
sheet.Cells("C1").LoadFromCollection(items, True)

...alternatively (from version 5.2.1 and higher):

sheet.Cells["C1"].LoadFromCollection(items, c => c.PrintHeaders = true);
sheet.Cells("C1").LoadFromCollection(items, Sub(c) c.PrintHeaders = True)

This will load the following data into the worksheet.
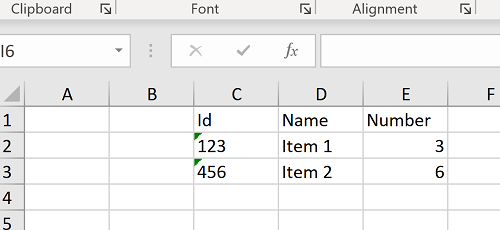
LoadFromColl3

Table style

The third argument - TableStyle - gives you the possibility to style the range as a table.

var tableRange = sheet.Cells["C1"].LoadFromCollection(items, true, TableStyles.Dark1);
// to get access to the created table:
var table = sheet.Tables.GetFromRange(tableRange);
Dim tableRange = sheet.Cells("C1").LoadFromCollection(items, True, TableStyles.Dark1)
' to get access to the created table:
Dim table = sheet.Tables.GetFromRange(tableRange)

...alternatively (from version 5.2.1 and higher):

var tableRange = sheet.Cells["C1"].LoadFromCollection(items, c => {
    c.PrintHeaders = true;
    c.TableStyle = TableStyles.Dark1;
});
// to get access to the created table:
var table = sheet.Tables.GetFromRange(tableRange);
Dim tableRange = sheet.Cells("C1").LoadFromCollection(items, Sub(c)
                                                                 c.PrintHeaders = True
                                                                 c.TableStyle = TableStyles.Dark1
                                                             End Sub)
' to get access to the created table:
Dim table = sheet.Tables.GetFromRange(tableRange)

...and this gives us the following result:
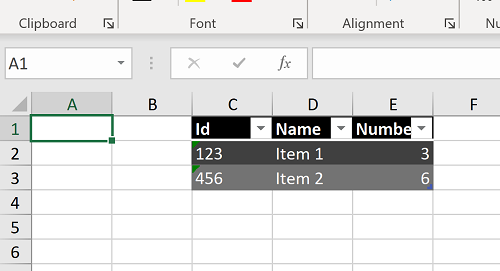
LoadFromColl4

The TableStyles enum gives you over 60 different table styles to pick from!

Headers

The default behaviour of the LoadFromCollection method is to replace underscores with a space - "My_property" will be "My property". But there are a few options to configure this.

Attributes

If you decorate the members of your class with the System.ComponentModel.DescriptionAttribute the value of this attribute will be used instead of the name of the property. If this attribute is not present EPPlus will look for the System.ComponentModel.DisplayNameAttribute. If none of this is present it will use the default behaviour (see above).

public class MyClass
{
    [DisplayName("The id")]
    public string Id { get; set; }
    [Description("The name")]
    public string Name { get; set; }
    public int Number { get; set; }
}
Public Class [MyClass]
    <DisplayName("The id")>
    Public Property Id As String
    <Description("The name")>
    Public Property Name As String
    Public Property Number As Integer
End Class

HeaderParsingType

Available from version 5.2.1 and higher

The HeaderParsingType argument is available on the following method signature:

sheet.Cells["C1"].LoadFromCollection(items, c => {
    c.PrintHeaders = true;
    c.HeaderParsingType = HeaderParsingTypes.CamelCaseToSpace;;
});
sheet.Cells("C1").LoadFromCollection(items, Sub(c)
                                                c.PrintHeaders = True
                                                c.HeaderParsingType = HeaderParsingTypes.CamelCaseToSpace
                                            End Sub)

If you set HeaderParsingType to HeaderParsingTypes.Preserve the header will be exactly like the member name. If you set it to HeaderParsingTypes.CamelCaseToSpace it will put a space before each capital letter in the property name ("MyProperty" to "My Property").

Transpose

You can transpose the data from you load from any collection by passing true as the Transpose parameter.

sheet.Cells["C1"].LoadFromCollection(items, true, TableStyles.Dark1, true);
sheet.Cells("C1").LoadFromCollection(items, True, TableStyles.Dark1, True)

Alternatively

sheet.Cells["C1"].LoadFromCollection(items, c =>
    {
        c.Transpose = true;
    });
sheet.Cells("C1").LoadFromCollection(items, Sub(c)
                                                c.Transpose = True
                                            End Sub)

Filtering members

The default behaviour is to import all members of a class, but you can specify which members to import with the Members argument. See the following example:

var t = typeof(MyClass);
sheet.Cells["C1"].LoadFromCollection(items, true, TableStyles.Dark1, LoadFromCollectionParams.DefaultBindingFlags, 
    new MemberInfo[] 
    { 
        t.GetProperty("Id"), 
        t.GetProperty("Name")
    });
Dim t = GetType([MyClass])
sheet.Cells("C1").LoadFromCollection(items, True, TableStyles.Dark1, LoadFromCollectionParams.DefaultBindingFlags,
    New MemberInfo() {
        t.GetProperty("Id"),
        t.GetProperty("Name")
    })

...alternatively:

var t = typeof(MyClass);
sheet.Cells["C1"].LoadFromCollection(items, c => {
    c.PrintHeaders = true;
    c.Members = new MemberInfo[]
        {
            t.GetProperty("Id"), 
            t.GetProperty("Name")
        }
});
Dim t = GetType([MyClass])
sheet.Cells("C1").LoadFromCollection(items, Sub(c)
                                                c.PrintHeaders = True
                                                c.Members = New MemberInfo() {
                                                    t.GetProperty("Id"),
                                                    t.GetProperty("Name")
                                                }
                                            End Sub)

From EPPlus version 5.6.1 a class exposing an property of type System.Uri or OfficeOpenXml.ExcelHyperLink will set the hyperlink property for cells in that column.
This example shows how to add a 'Mail To' property, setting the displayed text to the Name:

public ExcelHyperLink MailTo
{
    get
    {
        var url = new ExcelHyperLink("mailto:" + EMailAddress);
        url.Display = Name;
        return url;
    }
}
Public ReadOnly Property MailTo As ExcelHyperLink
    Get
        Dim url = New ExcelHyperLink("mailto:" & EMailAddress)
        url.Display = Name
        Return url
    End Get
End Property

The ExcelHyperLink class can also be used to create links to cells inside the workbook.

To add a column with url's, just create a property of type Uri in your class:

public Uri Url
{
    get;
    set;
}
Public Property Url As Uri

See also